Happy Holidays!
Dec 22, 2012
Merry Christmas Everyone!
I haven't craft much these past few weeks, except that I'm making my Hanging Towels as gifts for my family. I've also been stripping and sanding an old antique dresser my Mother bought for me. Simply gorgeous. I will share it with you all when it's finished.
Nov 13, 2012
Magazine Bowl

Last Christmas I made
homemade gifts for everyone in my family. For my Mother I made a recycled magazine coiled bowl and of course filled it
with chocolates. My Aunt June emptied it to look it over and fell in love with
it. I just made this for her.
I had first seen this project at Saved by Love Creations, but I could not find the post to share her projects and tutorial.
What you need for this
project
Magazines
Paper Cutter
Hot glue gun
Modge podge
 Sponge applicator
Clear coat spray
1. Tear out sheets from
magazine
2. Cut into 2" strips

3. Fold strips (This is a
job) Fold in half the open fold one side into the center and fold that one more time, repeat on the other side of the strip.

4. Begin with a tight
coil

5. Hot glue each folded
strip as you coil

6. Modge podge as you go
to keep it from moving.
7. After ending the coil,
I modge podge the inside, let it dry, then the outside, and repeat several
times. Then spray a clear coat on the inside let
it dry and then the outside.

8. Fill with candy!!!
Thanks for stopping by.
Happy Crafting!
Oct 31, 2012
Jar Art


Baby
Garden
Family
Cheer
Life's Journey
Birthday
Explorer
Fishing
Holiday, of course, then I got a few more of the Christmas Jar Art for gifts.
This jar art I made for my Sister who just had knee surgery. As a "hope you feel better soon" gift, I did the Victorian Roses Jar Art.
What you need to make this jar art- Cost
Jar
Art Kit $1.00
a
Canning Jar with ring and lid $1.50
scissors
4
bunches dollar store flowers $4.00
moss $1.00
a
chunk of styrofoam $1.00
 Total cost for gift $8.50
1
- wrap the jar with decorative card stock and use the included adhesive circles
to secure it in place


3
- put an adhesive circle on the bottom of the paper flower and press into the
center the frame
4
- secure the card stock strip on the jar ring

5-
tie the ribbon around the top of the jar.

So
easy, and so pretty!! She loved it!
Happy Crafting!!
Linked up Thursday @ The Taylor House, The ArtsyGirl Connection, Katherines Corner, Linked up Saturday @ Bowdabra Blog, The Gingerbread Blog, Linked up Sunday @ Thrifty Nifty Things, Linked up Monday @ Eye Heart, Watch out Martha, A Pinch of Joy, Sarah Dawn Designs, Making the World Cuter, Mighty Crafty, Cherished Handmade Treasures, Link up Tuesday @ Claiming Our Space, The Kurtz Corner, Hey Mommy, Chocolate Milk, Linked up Wednesday @ Lady Behind the Curtain, Ginger Snap Crafts, Fine Craft Guild Linked up Friday @ Craftionary
Oct 10, 2012
Backyard Halloween Golf

Have you ever seen Remco's backyard putt putt set from the 1950's, back when family's spent more time together....... (I know I wasn't even born yet). I saw this in an article in Country Living Magazine, Vintage Lawn Games, it sent me searching for ideas to make mini putt putt golf for the grandkids.

(this was a long drawn out search)
This summer I came across this set of KIDS GOLF CLUBS, $4, at a garage sell.
 I know, what a deal! I gave them to the grandkids to play with.
 I know, what a deal! I gave them to the grandkids to play with.
Now that I'm here living with them, I was back to thinking of ideas for the putt putt golf.
For a game at my grandson Elias's 7th birthday we played
"Backyard Halloween Golf".
I downloaded large Halloween coloring pages and printed them. Placed the picture on cardboard, cut out the outlines of the pictures; some of them we had to tape first to make them sturdier and painted them. (Suzy and I painted them)


We bought lawn stakes at the local hardware store, to keep them in place in the yard. There are 7 holes. We strategically placed them around the yard, Let's Play!
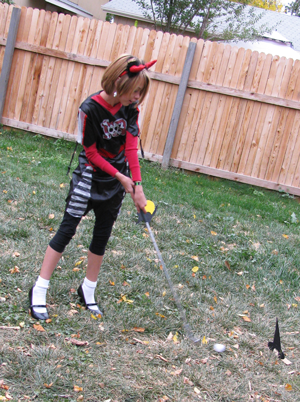
We kept score by how many strokes it took to get the ball to each hole, and if it went through the hole you got the bonus 1 point subtracted at the end of the game.

You'll never guess who won? Miss Harmony, the poser. I was shocked, too. I thought for sure I was gonna win.
Project Cost: $4.00 for golf clubs, $2.50 for the lawn stakes, family fun, Priceless.
To find these Halloween pictures online, in any search engine, type in Free Halloween coloring pages.

Happy Halloween!
Parties: Link it up Thursday @ Seven Alive , The ArtsyGirl Connection , Made in a day, The Taylor House, Katherines Corner, Finding Fabulous Link it up Friday @ Happy Hour Projects, Simple Home Life, Craftionary, Here Comes the Sun, One Artsy Mama, Petals to Picots, Create.Craft.Love, Link it up Satuday @ Bowdabra Blog, The Gingerbread Blog, Link it up Sunday @ Thrifty Nifty Things Link it up Monday @ Eye Heart, Created with Joy, Watch out Marha Link it up Wednesday @ Fine Craft Guild
Jun 19, 2012
Trash Can Lampshade

 |
| This is how it looked after the road trip! |
 This lampshade was in there. Other than looking old and yellowed, it was in perfect condition, (I mean the plastic wasn't broke up!). I grabbed it out of the trash and recovered it for Miss Deby.
I pulled off the trim that was yellowed and wiped it down with a sanitize wipe.

I laid the lampshade on tissue paper and traced it as I rolled it to make the pattern.
Pinned it and cut out the fabric.


I mod podged the fabric on to the lampshade.

Easy Peasy!

Is it me, or is he scary looking? I rubbed his Buddha belly for luck, just the same!
Happy Crafting!
Thanks for stopping by.
Parties: Friday Happy Hour Projects - Simply Link Party @ Simply Designing
May 24, 2012
A gift for baby


 When considering the fabric I would use, it dawned on me that I had this night gown. I wore it once for about 5 minutes. My boyfriend commented that it made me look like an old granny. It’s been sitting in a drawer for ever since. With the ruffle, the trim and the lacy embellishments on bodice, I figured it would be perfect for the bonnet.
I basically followed the instructions for the Old-fashioned bonnet, except (of course I changed it). Here’s what I did different. In her photo you can tell that baby is not a newborn. So I re-sized it, and followed her instructions up to this step.
Step 4: Form the unstitched end of a tie into a Z (fold it in thirds) and pin it to the large rectangle about 1.25″ back from the decorative trim along the 16″ side. Repeat with the other tie on the other side.

What I did was to fold up the rectangle (measuring all across to be sure that the ruffle was even from top to bottom), and stitch only the sides.


 |
| I know, I was a purty baby! |
Now after it was finished I had no way to gauge whether it would fit a new born or not. So I researched the average size of a newborn baby's head, enlarged a doll head pattern, printed off my baby picture, to make it more realistic, (hehe), I laughed the whole time, come on, that's funny. And this is how it looked, when I was taking the pictures for this post, my boyfriend come around the corner and caught a look of the baby face, and jumped, he didn't expect it.....I'm still laughing.


I made this for baby Madison. A romper with a matching bonnet 3M. For the bonnet I partially used Simplicity A2104 pattern and of course I changed it. I got the romper pattern from you can make this.com it's called THE CHELSEA ROMPER SIZES 3M-5T. What's cool about this pattern, it's downloaded so you can print it as you use it; and with it going all the way up to a 5T, I can make it for my Ella Bear, too.
Happy Sewing!
Thanks for stopping by!
Link Parties: Thursday- Make it, Wear it @ The Train to Crazy - Thursday Favorite Things @ My Turn (for us) Friday- Happy Hour Projects - Fun Party@Craftionary - Simply Creations @ Simple Home Life - Hodgepodge Friday @ It's a Hodgepodge Life - Flaunt it Friday @ Dotted Line Crafts Saturday- Project Party Weekend @ Bubbly Nature Creations - Sew and Tell @ Sew Country Chick - Saturday Showcase @ Bowabra Blog - Say Gday @ Natasha In OzAnything Goes @ Eye Heart - More the Merrier @ diy home sweet home - Creative Corner @ Cherished Handmade Treasures - Manic Monday @ Serendipity and Spice - Linking Up @ I Gotta Try That - The Cure for Common Monday @ Lines Across Ta-Da Tuesday @ Mommy by day Crafter by night - Talent Tuesday @ Vintage Wanna Bee - Fabric Tuesday @ Quilt Story - Time for a Party @ fine Craft Guild - Whimsy Wednesday @ The NY Melrose Family - Wildly Original @ I Gotta Create - Thursday Favorite Things @ Katherines Corner and @ New End Studio
May 15, 2012
Easy Carry Picnic Blanket

 I saw a beach blanket that had the coolest handle with straps on it. I was thinking, what an awesome idea for a picnic blanket. After all, I have that awesome Great Find picnic basket, I want to picnic this summer.....
I stopped at one of our local thrift stores and found this tablecloth. It was priced at $8.00, but I happened to walk in on half price day (sweet), so $4.
For this project
1 tablecloth (rectangle)
1 package rug binding (white)
4 inches of hook and loop velcro
sewing machine, thread, scissors, pins
Instructions
1. Lay an H on the folded end of the tablecloth, these measurements are 17" for straps and 8" for handle.
2. Pin velcro on both ends of strap; hook up, loop down on the opposite side of the strap, opposite end. Then sew around all 4 pieces of the velcro to the straps.
3. Double the handle to make it sturdier; sew two 8" pieces together.

4. Take finished pieces and form H onto tablecloth, pinning down, with the Hook side of the velcro straps up. Leave the loop side (down)unsewn, (you may want to pin them out of your way.)
5. Sew close to the edge, sewing over the handle, then stopping.
6. Sew all the way around the handle end forming a square, then sew corner to corner, to secure the handle. Repeat on the other strap.


Lastly, spray with fabric protector so it will last longer and it's easier to clean up.

Let the picnicing begin.
"pass the tator salad, please"
Happy Sewing!
Thank you for stopping by.
Sharing this Project At The Cozy Home Scenes Picnic Party!!!!

![[Stackedcup-1_thumb%255B4%255D.jpg]](http://lh6.ggpht.com/-BpNJEA9CtpY/T70Z29FFDjI/AAAAAAAAMZ8/stnWeEBwneI/s1600/Stackedcup-1_thumb%25255B4%25255D.jpg)
Subscribe to:
Posts (Atom)